
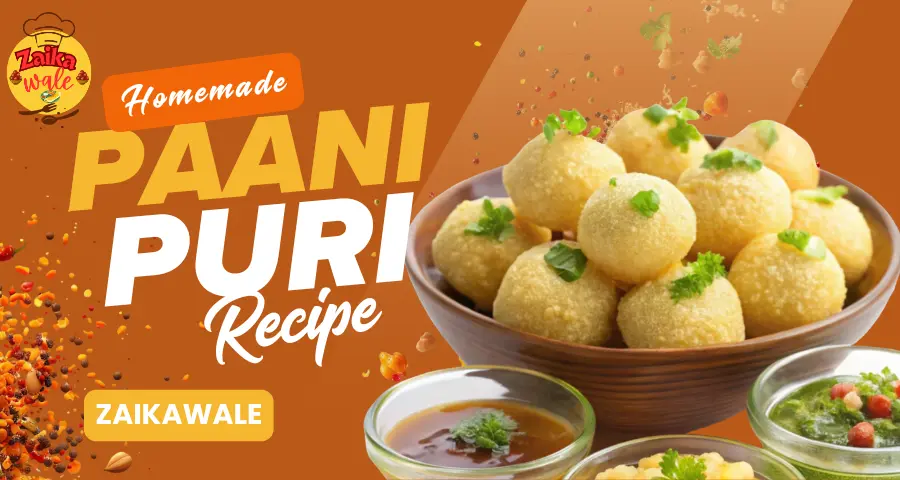
India’s most popular street food No introduction needed for pani puri! “,pani puri (pani puri recipe) is made up of crispy, hollow, and loose puris that are filled with boiling potatoes, steamed moong sprouts, boiled chole, or even white pea curry, commonly known as ragda. Sweet chutney and sour and sweet water go well with them. Everyone’s favourite chaat snack is pani puri, including us!
Just one taste is insufficient while eating pani puri since so many aromas and tastes burst into your mouth at once! Whether you call it Gol Gappa, Puchka, Pakodi, or Pani Patasha, this popular Indian street food is a true emotion that unites foodies across the country.
Why wait for your next trip to a thela-wala when you can make this at home? Here’s a complete, step-by-step pani puri recipe with homemade pudina pani, stuffing, and even puris if you want to go all out!
What is Pani Puri
Pani Puri is more than just a snack, it is also a sensory treat. While “Puri” describes crispy, puffed, hollow round balls made through deep-frying dough till golden and crunchy, “Pani” means water.These puris are packed with a variety of tasty ingredients and then carefully cracked open. Teekha Pani, commonly known as the hot and sour mint-coriander water, is the major attraction. Its strong flavour awakens the taste. Meetha Pani, a sweet, thick tamarind-date chutney, is frequently used to offset this, giving each bite a pleasing combination of sweetness and spice.
The filling inside the puri can vary – traditionally, it includes boiled and mashed potatoes, cooked chickpeas, or moong sprouts, depending on the regional style. In some variations, especially in Mumbai, a warm, mildly spiced dry curry made from white peas – known as Ragda – is used. The puri is then dipped into the chilled flavored water, letting it soak up the spicy and sweet juices, and eaten whole for an explosion of flavor and texture.
Making the delicious tamarind chutney is not necessary for this simple pani puri dish.
My pani poori food is spicy, sour, and sweet.You can create the sweet chutney, though, if you like a sweeter flavour.
My mom used to make pani, or spiced water, this way to save time and give it all three of the key flavors: sweet, sour, and spicy. So you get all three tastes – teekha, khatta, and meetha – in one pani. Otherwise, the spicy chutney and sweet chutney can be made separately.
My childhood favourite chaat is pani puri. These used to be something I really loved, and I used to have them often with my family on the streets of Bombay.
Video Guide for Veg Briyani Recipe
View this post on Instagram
Ingredients
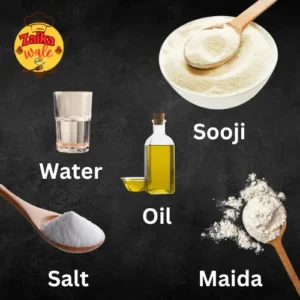
1. For the Puri Recipe (Golgappa)
- Semolina (sooji/rava) – ½ cup
- All-purpose flour (maida) – 1 tbsp (optional)
- Salt – a pinch
- As you need to do kneading, use water or club soda.
- Oil – for deep frying
2. For the Pani (Mint-Flavored Water) Pani Puri Recipe
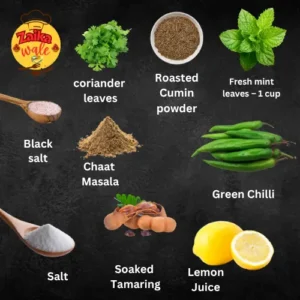
- Fresh mint leaves – 1 cup
- Fresh coriander leaves – ½ cup
- Green chillies – 2 (adjust to taste)
- One tablespoon of tamarind (soaked in ¼ cup water)
- Black salt – 1 tsp
- Roasted cumin powder – 1 tsp
- Chaat masala – 1 tsp
- Salt – to taste
- Lemon juice – 1 tbsp
- Cold water – 4 to 5 cups
3. For the Filling (Masala) Pani Puri Recipe
- Boiled potatoes – 2 medium (peeled and mashed)
- Boiled black chana or white peas – ½ cup (optional)
- Roasted cumin powder – ½ tsp
- Red chilli powder – ¼ tsp
- Black salt – ¼ tsp
- Salt – to taste
- Finely chopped coriander – 2 tbsp

How to Make Pani Puri recipe at Home
Suji ki Puri, with step-by-step photos for golgappa, pani puri, and puchka. These crispy and light puris are made using a dough mixed with all-purpose flour and semolina. The different delectable pani puri fillings fit perfectly in this carrier. Your favorite pani puri or puchka can be made with a large batch of these suji ke golgappe, which should be kept in an airtight container.
Step 1: Prepare the Puri (if using store-bought, optional) Pani Puri Recipe
- One cup fine unroasted sooji, rava, or semolina (160 grams), 1 teaspoon oil, 3 to 4 pinches of baking soda, and ¼ teaspoon salt should all be combined in a mixing dish.
Do not forget to use rava with a fine texture. Bombay rava is another option. It should be within its expiration date and free of mold or insects.
- Using your fingertips, evenly distribute the oil over the sooji.
- This is the mixture of oil, sooji, and salt that has been evenly mixed.
- To this mixture, add 1 tablespoon of all-purpose flour, or maida.
- Mix thoroughly once more to ensure that the all-purpose flour is uniformly distributed.

- Start by adding three teaspoons of water.
- Mix and stir once more.
- Next, start kneading the dough with an additional tablespoon of water. As Sooji kneads, it absorbs water. Thus, while kneading, add water in small amounts. Continue kneading after adding two teaspoons more of the water. Six tablespoons of water were added.
You might need to add a little less or more, depending on how good the sooji is. To achieve the ideal pani poori texture, kneading is crucial.
Don’t forget that the dough is neither too soft nor too firm. Add an additional 1 to 3 teaspoons of the sooji if you make the dough soft. Add a little water and keep kneading if the dough seems hard.
- The dough for the puri must be elastic. For it to give the pooris structure and shape, gluten strands must develop.
The proper texture of the dough makes it possible pooris to puff up and remain crisp. Thus, knead thoroughly
Elasticity aids in spreading the dough thinly and without cracks. The dough should roll without cracking when rolled.
The rolled dough should lift easily and not tear , break and crumble when you lift it.
- Knead the dough until it becomes stretchable and semi-soft.

- Store the thoroughly kneaded dough in a pan or basin.
- Let the dough rest for half an hour by covering it with a damp napkin or dish towel.
- Here’s the dough after it has rested for 30 minutes.
- Keep kneading for extra two to three minutes.
Put Together and Roll
- At this point, separate the dough into two or three portions. Place a single piece on your work surface and start rolling. Avoid adding any dry flour when kneading. Cover the remaining dough with a damp kitchen towel to keep it from drying out.
- Make a big round. As you can see, there are no cracks and the rolled dough has good elasticity. The entire rolled dough can be turned over without rupturing or ripping.
- Continue rolling until the circle is even and thin. It is necessary to roll the pooris thinly. The foundation gets thick and stays soft even after frying if it is not thin. If the dough is not rolled out evenly, the pooris will not swell.

- Using a cookie cutter, a plate, or the lid of a small jar, cut the rolled dough into small to medium discs.The pooris are uniformly shaped and sized when made with a cookie cutter.
- You can also make small balls and roll them using a rolling pin.The pooris won’t have a consistent, even shape, though.

- Remove the corners of the dough and place the little roundels on a plate without touching. To keep these pooris covered, use a moist kitchen towel.
Gather the scraps of dough and give them a little knead. Repeatedly roll out this dough and make pooris like before.
Make all the pooris in this manner, then cover them with a damp dish towel. You can also roll and cook them at the same time, like I did.
- For deep-frying, heat oil in a pan or kadai.It should be medium hot in the oil. A small portion of the dough ball should be added to the heated oil.
The pooris are ready to be fried if the ball rises steadily to the top of the heated oil. If you cook the puri at a low oil temperature, they will get soaked with oil.
When fried at a high temperature, the dough will be mushy and overcooked, but the crust will brown quickly.
- A few pooris were slid into the oil. However, avoid packing the kadai too full.
- As soon as you dip them in the hot oil, they will instantly swell up. Depending on the pan’s size, you can fry four to eight pieces at once. Using the frying spoon, gently press the pooris to make them swell.
- When they swell, use a slotted spoon to turn them.As needed, flip a few times.
- Even when the oil no longer sizzles, keep cooking the pooris until they are golden or light of color. Once browned, cook them for a few more seconds in the oil to crisp them up.
- This method of frying gives the pooris a crispy texture on the outside and interior. If not, they might continue to be crisp on the exterior and soft on the inside.
- Drain the puris with kitchen paper towels. There will also be some flat puris. Papdi chaat, Sev puri, Bhel puri, and chana dal bhel puri can all be made with these.
- Continue to fry the remaining pooris in batches like this.
- To get rid of extra oil, drain puris on paper towels.
- As soon as the puris cool to room temperature, put them in a jar or box and securely seal the lid.
- A close-up photo of the crunchy texture of the poori.
- To prepare Ragda puri, Dahi puri, or Pani puri, use these homemade puris, golgappas, or puchka.
- 50 to 60 sooji puris will be made using this recipe.If kept in an airtight box or container, they remain fresh and edible for a month.

If the crispy texture has been lost, dry roast the puri in a pan or kadai for a few minutes to make them crisp.
You may instead bake them in the preheated oven for a few minutes at 180°C for a crispier texture.However, watch out that they don’t burn or brown too much in the oven. Therefore, watch them as you toast them in the oven.
Step 2: Making the Pudina Pani for Pani Puri Recipe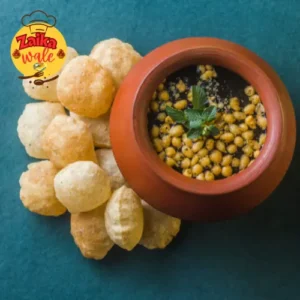
The key to any pani puri recipe is making the Pudina Pani (Spicy Mint-Flavored Water), which adds the explosive tastes of tang, spice, and refreshment that make this chaat so irresistible. To make this tasty pani, start by blending together ½ cup of tightly packed chopped mint leaves, 1 cup of tightly packed chopped coriander (cilantro), 1 inch of minced ginger, 2 to 3 green chilies (use just one for a milder version), and 1 tablespoon of firmly packed tamarind.
You can change the amount according to your taste, but for a sweet balance, add 3.5 to 4 teaspoons of jaggery (either grated or powdered). Add 1 teaspoon of chaat masala and roasted cumin powder to this, as well as ⅓ cup water to assist combine into a smooth paste.
Strain the mixture after blending, then add 1 to 1.25 cups of water to adjust the consistency to your preference. Season with black or normal salt as needed. For extra crunch and texture, you can optionally add 1 to 1.5 teaspoons of boondi, which are tiny fried gram flour balls, right before serving. This pudina pani is best served cold, so chill it in the fridge before making your pani puri!
Step 3: Method For Masala:
Add the mashed potato, kala chana, red chilli powder, cumin-coriander powder, chaat masala powder, coriander leaves, and salt (if not already added when the potatoes and chana were boiling) to a bowl.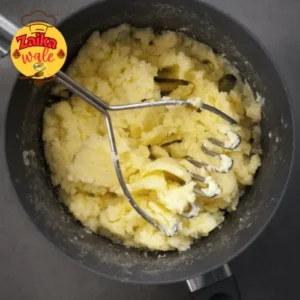
With a spoon, combine them. The masala is prepared.
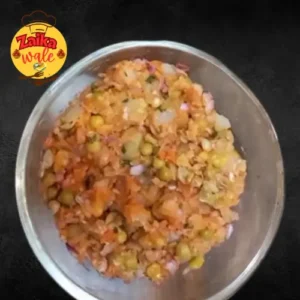
Alternative: You can also use ragda (white pea curry) as a filling for a Mumbai-style pani puri experience.
Step 4: Assembling the Pani Puri
- To make a hole, lightly tap the puris on top.
- Place a teaspoon of the potato-chana filling within.
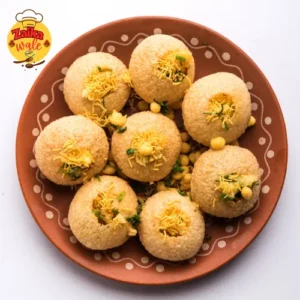
- Pour chilled pudina pani into the puri or dip it in.
 Serve immediately and enjoy the burst of flavors!
Serving Tip: Let everyone make their own by keeping the puris, filling, pani, and sweet chutney in different bowls.
Optional Sweet Chutney for Pani Puri Recipe
Add imli chutney (tamarind-date chutney) into your puri if you like a sweet-tangy kick:
Ingredients:
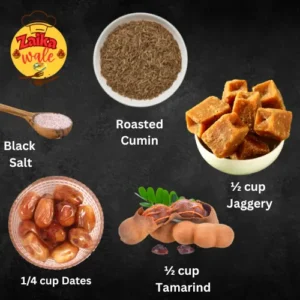
- Tamarind – ½ cup
- Jaggery – ½ cup
- Dates – ¼ cup (seedless)
- Roasted cumin – 1 tsp
- Black salt – ½ tsp
Method: Bring everything to a boil in water until it’s tender, then combine, drain, and chill. Before adding pani, insert a spoon into each puri.
Explore more from our kitchen! Here are some of our previously published blogs you’ll love – filled with easy steps and authentic flavo
Click here for the perfect naan recipe


